Tuesday, January 18, 2011

 This is the current state of my strippy blocks, and I think I'll make another 20 or so , to make a large single bed size.

It will be a donation quilt, to go the Queensland flood appeal.  Lots of groups are making raffle quilts to raise money, so that might be where this one goes, or I might donate it to someone who needs it.  My daughter lives in Emerald; it wasn't that long ago that they were in severe drought, and the dam was empty.  Now they are recovering from a flood where 80% of the town went under water.  Talk about a land of extremes. She's still a bit shocked that her house was one of the few that didn't get flooded, luckily.

I've been involved with a little fundraiser of my own, with the computerised quilting lists that I'm on, and we have raised nearly $3000, which is absolutely fabulous.  It's good to be able to make a contribution, no matter how small. I 'd like to echo Bonnie's sentiments in this post, about how you can give to the Premier's Appeal.  A lot of the places under flood are places I've lived, including the Lockyer valley where I went to Agricultural College.  It hurts to see such devestation wreaked on an area of  beautiful, productive farmland.

I haven't had a lot of free time, so not much more sewing has taken place, but for my own sanilty I need to get back to my machine. Dolly and Pippi know the antidote for stress; a comfy bed in a patch of sunlight, and a quilt to snuggle on.

Read more...

Sunday, January 09, 2011

 I've done a little bit of sewing in amongst other chores, but not as much as I could have. 


These scrap blocks are fun and easy, but the seam allowances of adjoining blocks were clashing, and I was too lazy or distracted to work out how to press them to avoid that.  And that was stopping me from sewing more of them.  The best to do was to take photos for a tutorial, so that I can refer back to the blogpost whenever my fickle memory forgets exactly what I did.

I could always refer back to the correctly pressed blocks, or I could do what I did in the past and copy the pressing of an incorrect block too many times to count and have a dreadful mess to deal with later.  The blogpost is the sensible option.

There are two blocks with the values in opposite places, what Mereth and I refer to as Counterchange blocks.  Both are laid out a little differently, and pressed differently.  But they all start out with these basic units.

I sew most of my longer 1.5" light medium strips into pairs, and then sew those pairs together to make a pieced strip 4.5" wide.  I cut those into 5.5" slices, and add a fifth strip, 1.5" x 5.5". That allows me to use up all shorter lengths of strips.  I do the same with all the dark medium strips.  It doesn't matter what way the seams are pressed in these units.  The aim is to have a 5.5" pieced square.

The dark and light strips are sewn into pairs, seam pressed to the dark fabric; then they are cut into 5.5" slices.  At then end of the strip, when there isn't enough room for another slice I cut 1.5" pieces, and these are paired together to make fourpatches.  The fourpatches are pressed like this.

Because there are two different blocks to make I can't just sew all these units together any old way.  I need all the blocks oriented the same way for the pressing system to work (I sound as bad as Mereth now, who has confessed to not making blocks she likes because she can't get the seams to nest nicely!)

I lay out the light blocks like this, and sew the fourpatch to the light/dark rectangle, seam pressed away from the fourpatch.  A light/dark rectangle is added to the side of the strip-pieced square, seam pressed to the dark.  See how the strips in the square are aligned vertically?

Sew that final seam through the block, and press it towards the dark strip.  It will want to do that anyway, because all those seam intersections don't want to press back on themselves.

Lay out the the dark square as shown; the strips in the pieced square are horizontal. 
Sew the units together as in the other block, seam pressed away from the fourpatch, and away from the pieced centre square.  Sew the joining seam, and press it down towards the pieced square.

If all the blocks are made and pressed like this, they fit together without a hitch, all the seams nested together.  That makes me a lot more enthusiastic about getting on with the project.
 The photos are crappy, taken late in the afternoon with bad lighting, but they will have to do.  I'd rather spend today sewing than taking decent photos. 

Oh and it's going to be on point now, because everything looks better on point.
Now that I look at it, some of those strip squares are oriented in the wrong direction.  It doesn't matter a bit, except that those blocks won't play nicely with their neighbours when it comes time to join them.  I don't mind mashing a few bulky seams flat, but a whole quilt like that is daunting.  I'd rather take the time to work out a system and stick to it, even if I have to do a tutorial to remember. 

Now if I could just remember where I put my Ott Light, and my hand-piecing supplies. and my Etui sewing box, and my other box of 1.5"strips.   I thought we were being so careful when we moved here, but that last flurry of packing the presious stuff was done in an unsound state of mind.  I have no idea where some things were stowed, and it will be a voyage of discovery to track them down.

Read more...

Wednesday, December 29, 2010

It didn't feel like Christmas this year for some reason, and now I can't quite believe that we've nearly finished with 2010.  The year is galloping to a close, and I feel totally left behind.  I'm not ready to start writing 2011 as the date.

We did have a lovely get together with Mereth's boys and their partners, plus Curtis the WonderDog and new baby Logan. 

It was great to see them all again, and Logan was welcomed with delight.  He hardly had a chance to sleep in his bed, there was always someone waiting for a turn to hold him.  He was placid and good-natured and utterly adorable. 

Dolly and Curtis got on like a house on fire, but Curtis just couldn't work out what Pippi was.  She was too small, and too quick, and she kept chewing on him with needle-sharp puppy teeth. He was reduced to begging his mum to protect him.

We went to Adelaide on Boxing day for a quick visit; this photo is of the salt lakes at Lake View.  They were a vivid fuchsia pink, completely unreal.  We took lots of photos, but the colour doesn't come out true to life.  It's particularly pink this year, it looks like it's been Photoshopped.

I thought that it would have been a terrible Christmas break if there was no sewing accomplished, so I sewed a few more of the Road to Oklahoma blocks, but my heart isn't really in it.  Then I decided I was thoroughly sick of my overflowing drawers of strips.   I usually do Bonnie's mystery quilts, and that helps clean out the strip drawers, but I didn't have time for that this year. 

The first drawer I tackled was the 1.5" one.  I had no idea what I wanted to do with them, so I just started sewing them into pairs, which I've done two or three times before.

The sewing time lets me decide what I'll do next.  Last time I did this I made hundreds of four-patches and it took ages before they were all used up.  This time I wasn't particularly keen on the four-patch idea, and I'd been thinking how much I like the way Bonnie makes new fabric by string piecing all the little bits together.  So as well as sewing pairs of light and dark strips, I also sewed similar coloured strips together so I could cut a larger square out of them.

The light/dark pairs will form a sashing around the strip pieced squares, the small bits will make the four-patches and hopefully every last little scrap will find a place in this design.

What amazes me is that if I've regularly cleared out this size of strip drawer; why then are there such old and unlovely bits still there??  Where are they coming from?  Will I never be rid of them?

Once all these bits are used up I'll make crumb blocks as the large square, and just keep going until I've used up all the stray bits cluttering my workroom.  And I'm going to get rid of anything that makes me think twice about including it. If I don't love it, it's going to be thrown out or given away.  I'm going to start 2011 with the scraps thinned out and the drawers a lot emptier.

Read more...

Sunday, December 19, 2010

It's a working weekend for me, I'm trying to get all the quilts with Christmas deadlines finished.  We've already done 5 quilts this week, but there's no time to waste if these quilts are to get  back to their owners in time. 

The cross-hatching on this embroidery quilt is nearly finished, then it's a matter of filling the 13" wide borders.  At least there's lots of room for quilting.  And the owner of the quilt is going to finish off all those thread ends, which is one less job for me to do.

I can't believe it's nearly Christmas, it just doesn't feel like it at all this year.    Maybe one evening we'll go driving and look at all the lights and decorated yards, that always helps set the mood.  The weather is really strange too, it's positively cold at times, and that is so unusual for our summers.  Last year there was a record-breaking heatwave, this year is the coolest, wettest summer for decades.  I'm loving it though, certainly not complaining.

I even did a little bit of sewing, trying out another idea for using the Easy Angle ruler.

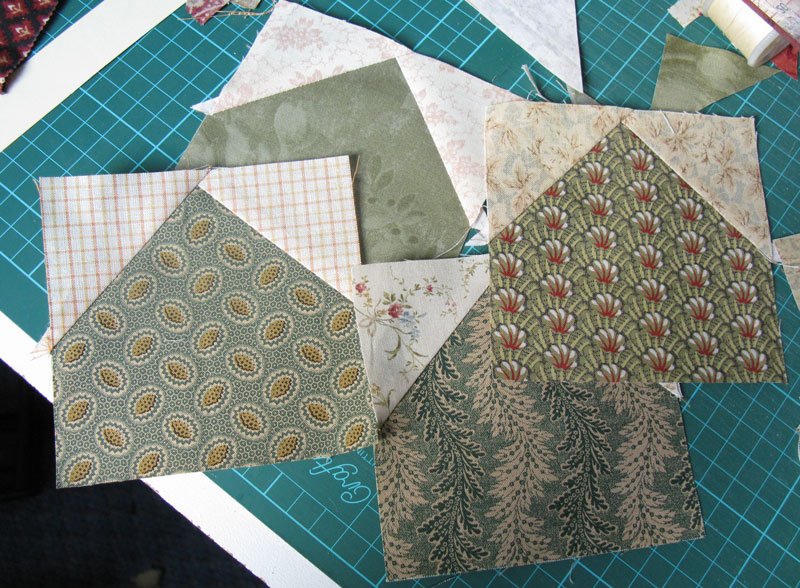
 I've always loved this shape, but it's not the easiest thing to rotary cut with an ordinary ruler.  This is how I did it with the Easy Angle;

start off with a 4.5" square.  Place the 2.5" line on the edge of the square, with the other edges of the ruler lined up with the edges of the square, and trim off the corner.

Flip the square over and trim off the other corner.  You can flip the ruler if you prefer, but I like doing it this way as the markings are easier to read.  You now have an irregular pentagon shape.


Cut two 2.5" triangles with the Easy Angle.  Place one on the pentagon, and sew with a .25"seam.


Press seam towards the light fabric, and add the other triangle.
TaDa!!  I love these little units, they're like houses. 

I can see me making a lot more in my spare time, there are so many nice blocks that can be made with them.  In fact, I've already whipped one up.


Mereth came round this afternoon to do some work, and I showed her the evidence of what her puppy has been up to. 
Apparently Pippi has a taste for literature!  We'll have to stop her chewing precious things like books, she can have bannister brushes and tennis balls and wooden spoons, but stay away from the bookshelves.

It's hard to be cross with this face though.

And this is my pup, in her guise of Hypno-Dog, trying to hypnotise me into taking her for a walk on this windy afternooon.  Looks like it worked, we're off to the golf course.


Read more...

Saturday, December 11, 2010

I received a nice little surprise in the post last week, a copy of the latest Homespun Magazine.

This edition of the magazine is well worth buying; there's a project in there from Kellie over at Don't Look Now; I'm a huge fan of her designs, so clean and fresh.  I just may be tempted to try her methods on a little wall-hanging.

On the cover is a Storm At Sea quilt that I made, and as usual they did a wonderful job on the article.

 When I was asked to make this quilt for the Summertime Issue I wasn't immediately overjoyed; this block has always been on my Must-make list, as well as my Too-much-trouble list.  But I saw it as a challenge, to make the quilt with the easiest most accurate methods, and maybe help someone else conquer this pattern.

I made it using Freezer Paper templates for foundation piecing, which worked a treat.  Once I had the instructions for the templates and method worked out I gave them to Mereth and asked her to trial them.  That was actually my sneaky way of making her do some of the blocks for me; I'd better credit her with 5 finished blocks.

I had a pile of blue pieces ear-marked for removal from the stash, and this pattern is great for stash reduction.  There are so many different size pieces, it utilised every big and little scrap in the pile.


I first saw this pattern in the first quilt book I ever bought, The Standard Book Of Quiltmaking by Marguerite Ickis. 

I bought it Wodonga, in 1977;  I was a measly 18 years old, and I was travelling from the Airforce base at Laverton in Victoria, to Wagga, NSW to continue my training. 

Check out that price tag!  It was all so long ago....

The instructions are pretty woeful, and the diagrams are basic, but it shows genuine antique quilts and it has a naive air that takes me straight back to my early, enthusiastic days of discovering quilting.  If I sometimes wonder why I'm doing this thing called  Quilting, a quick trip through this book and down memory lane puts my world to rights again.

Read more...

Sunday, December 05, 2010

 Tutorial as promised.  A bit late, but I've had a very busy week.

I've always loved this block, Road To Oklahoma, but the construction didn't appeal to me.  I didn't want to sew it with HSTs and have extra seams in the background, and I didn't want to draw diagonal lines to sew on with the flippy corner method.  So every time I thougt about making the block I also thought 'Meh. Can't be bothered'.

A while ago I wondered why you couldn't cut that trapezoid shape with a ruler.  And it turns out, the Easy Angle is made for it.

I already use and love this ruler, as does Bonnie, but now I love it even more.  When I think of all the patterns made with this shape I can't wait to get started on them.

These are cut from 2.5"strips, using the 2.5"and 4.5"markings on the ruler.  It will also work with other measurements, like 1.5"and 3.5", and the larger Easy Angle gives even more sizes.

To make this block, use a 2.5" background strip folded double, so that you are cutting a reverse shape at the same time.  Cut both sides of the ruler, the straight one and the slanted one.
If I were clever I would have taken a photo of the end trimmed square, and the ruler aligned with the edge, but ......
Rotate the ruler, and cut another shape from the folded strip, and then you can even use the same ruler to cut a pair of 2.5"squares.  Neat!

Stack two dark 2.5" strips, wrong sides up, and cut out a traapezoid shape, rotate the ruler and cut a triangle, then 2 squares;  remember there are two layers, so you are cutting all the shapes needed for one block with as few cuts as possible (2 trapezoids, 2 triangle and 4 squares).

 Line the ruler up with the points on those trapezoids, and nub off the points.  This makes it super easy to line up the pieces later.


Lay out the shapes, so you can see what has to go where.
 Take the 2 trapezoides on each side and lay them right sides together like this; see how easy they line up?  Press the seam towards the dark patch.
Add a dark square to each light end, and press towards the dark fabric.  Make the remaining squares into a four-patch.

Sew the triangles to the other light trapezoids. Press the seam towards the dark patch.
Layout all the pieced units, and sew together.  Press seams away from the four-patch.
Sew the three rows together and press seams away from the four-patch.

And there you have it, a Road To Oklahoma block, in record time with no unecessary seams.   I think I need another 50 for my quilt, so I'd better get sewing.

Read more...

Tuesday, November 30, 2010

These apricot and brown stars are on my design wall now, and my cutting table is full of scraps so I can cut out more.  Problem is, I don't particualrly like the colour scheme any more, which is why  blue and green and red are creeping into the blocks.  I can't do a controlled colour scheme, it's beyond me.  Before I know it, it's all gone scrappy again. 

I've had this block on my To Do list since the early '80s, so it's good that I'm actually making it.  I came up with an easy way to do it, so I'll do a little tutorial on that as soon as I find time to edit the photos.

Read more...

Sunday, November 28, 2010

Finally the move is complete, and now it's just a matter of arranging everything and getting back to work.  The Statler isn't running every day just yet, we've had too many other things to do, so it will be wonderful when that part of the business is back to normal.

We've had the most amazing weather, very cool and rainy, and it's bad for the farmers trying to harvest crops, but Mereth and I just love it.  It's raining today, the perfect day to stay inside and sew, which I intend to do next.

I bought all my pot plants from the other house, so I have an instant garden;

it's so lovely to have all my favourite flowers here, I'm going to enjoy making a proper garden once the worst of the summer is over.  I'm already making huge plans for a rose garden, it will be easy to go overboard as I have so much land here, but I will try to be sensible. 

The sewing area is set up, and it's a little bit smaller than my old room, but I will make do. 

I've stored all my UFOs in the back of the hall, and I'll probably forget they even exist.  Out of sight, out of mind. 
But there's not enough room for everything in one spot, so I'll have to adjust to that.  Maybe I'll make a rule that I have to work on one UFO a month till they're all gone.

Mereth sent me a link to a blog post on the Stash Manicure blog, and I keep going back to look at it.  This woman's sewing room is amazing, and I would love to be that organised.  I'll use a few of her ideas in my new sewing area,


What a wonderful room.


 and this

 The puppies are utterly adorable, at 5 weeks old, and we go out each day to drop supplies off to Matthew (lots of newspaper and puppy milk) and spend a few minutes playing with them.  It's important to socialise puppies, so we feel like it's a valuable job we're doing.  Dolly is amazingly gentle with them, and follows them round protectively, even letting them pull on her ears or bite her face. 
She's like her dad in lots of ways.  I must take some little videos, because this stage goes so quickly, and the puppies are ready for new homes in two weeks time.

 I haven't done a bit of sewing for 5 weeks, so today I will unearth my apricot and brown stars, and sew some more of them.  I think I know where they are....

Read more...
Blog Widget by LinkWithin

About This Blog

Lorem Ipsum

  © Blogger templates Newspaper III by Ourblogtemplates.com 2008

Back to TOP